XBee API Mode Tutorial Using Python and Arduino
Jun 1, 2014 00:00 · 5016 words · 24 minutes read
Disclaimer: This is just a tutorial.
This is intended to educate with basic XBee API mode setup, and how the XBee frame format works.
If you’re looking for a library, I recommend for XBee for Python and checkout xbee-arduino for Arduino.
/Disclaimer
Introduction
This post is a tutorial, with example code, covering how to communicate using XBee 802.15.4 (Series 1) radios in API mode using Python and Arduino. I decided to write these tutorials because I couldn’t find a substantial amount of simple examples when I decided to use XBee’s in API mode while working on my Masters thesis. It’s my hopes this tutorial can help other people working on applications similar to mine get off the ground and running faster.
Some knowledge of serial/UART communication mechanics, Python, and Arduino will be helpful for this tutorial but not absolutely required. It’s hopeful that this tutorial can aid in your learning if you’re also picking these up as you go. All example code is available at the GitHub Repository
This tutorial does assume you are familiar with Digi X-CTU and Arduino software. You will be instructed what to do in X-CTU and Arduino (e.g. “compile”, “change these settings”), but will not be instructed how to do it (e.g. “push the blue button”, “go to menu File->”)
Requisite Hardware
- 2 XBee 802.15.4 Series 1 radios
- 1 XBee 3.3v-5v adapter / break-out board
- 1 XBee USB adapter
- 1 Arduino board (This tutorial was written with an Uno)
- 1 Breadboard and jumper wires
I recommend the Parallax XBee Wireless Pack, but there are also several other options on SparkFun, Adafruit, Maker Shed and other hobby electronics stores. Many of them are very similar to the pieces used in this post.
Requisite Software
- Digi X-CTU
- FTDI Drivers (for USB to Serial communications)
- Python 2.7 or 3.3
- PySerial library
- Arduino Software
Why XBee 802.15.4?
XBee radios are handy in embedded applications because they enable wireless communications with relatively low power compared to Wi-Fi, bluetooth, or cellular technologies at the cost of slower speed. XBee 802.15.4 (Series 1) provides simple OSI layer one and two functionality on the module. Zigbee radios (XBee Series 2) provide an additional networking layer that can handle cool things like automatic mesh networking, however, Zigbee mesh networks are limited to a maximum of 10 nodes. Zigbee radios can also operate in API mode, frame packaging is the same, and the frames used for Zigbee are very similar. This tutorial covers XBee 80.15.4 because their frames are simpler for beginners and are all we need to cover the basics.
Why XBee API mode? A Brief Review
Using API mode to communicate has a few advantages compared to other XBee configuration options:
- No need for timely switching in/out of command mode to change configuration options
- Message destination addresses can be specified on the fly
- Received message frames come packaged with an RSSI (Received Signal Strength Indicator) byte
- Feedback is provided on message transmission success when enabled
In API mode, all incoming and outgoing messages are required to be packaged in frames. The picture below summarizes a few of the basic frame types based on descriptions in the XBee 802.15.4 product manual.
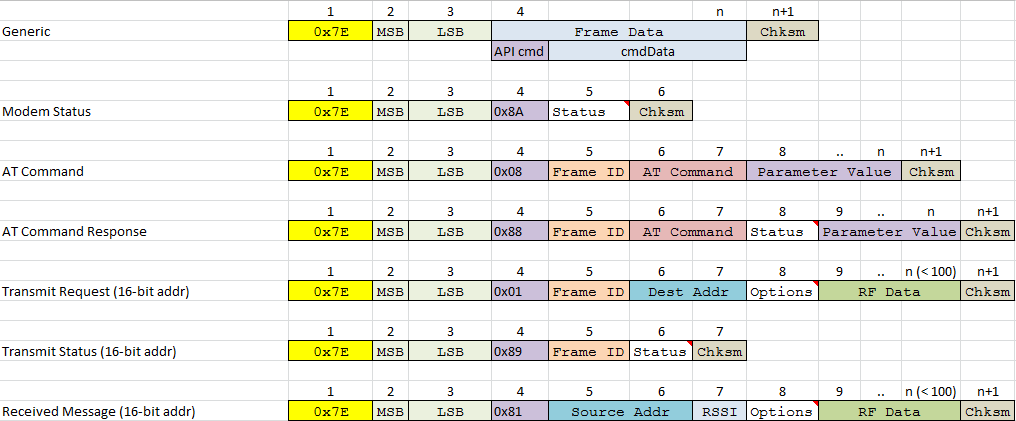
Each frame has a minimum of the the following:
- Start delimiter byte
0x7E“there is a frame here” - Most Significant Byte (MSB) “the start byte is at: “
- Least Significant Byte (LSB) “the end byte is at: “
- API identifier (cmdID) “the content looks like: “
- Frame data (including additional bytes specific to API message type)
- Checksum byte “all contents compress to: “
The start delimiter simply denotes the beginning of a frame. The MSB and LSB are used to indicate the length of the data in the frame. The length of the frame is the number of bytes after the LSB, not including the checksum byte. The MSB is always 0x00, so the LSB will be equivalent to the length. Every frame will have an API identifier specifying what type of frame is being sent (this tutorial will cover the 16-bit address transmit and receive message types). After the API identifier comes any additional bytes required by the specified frame type. After that is the actual frame data (in the case of a transmit and receive frame, the data to transmit/received). The checksum byte is used to verify the integrity of the contents. The checksum is calculate using the following process:
- Sum value of each byte after LSB
- Preserve only the lower 8 bits (AND with
0xFF) - Subtract the value from 255
This enables simple verification of received frames because the lower 8 bits of the sum of all bytes after the LSB (including the checksum) will be equal to 255 or 0xFF.
After formatting the previous parts, a final step is necessary if you’re using API mode with escaped characters. When escaping is enabled, any bytes (excluding the start delimiter) that contain reserved characters (0x7E, 0x7D, 0x11, and 0x13) must be escaped so that the XBee will not interpret them as control characters. This may seem like extra overhead, but escaped mode simplifies message reception so that you can count on any 0x7E byte to only indicate a start delimiter (or an ignorable error). This removes the need to program for more edge cases and simplifies code.
To escape a message, anywhere in the message (including the MSB, LSB, and checksum bytes) a reserved character appears, it should be replaced with an 0x7D escape character followed by the original character XOR’ed with 0x20. For example the bytes 00 11 23 after escaping would become 00 7D 31 23.
So, in a nutshell, the process for formatting an API frame is:
- Calculate the full length of the message (minus start delimiter and checksum) and insert it as the LSB
- Calculate and insert any bytes necessary for the API frame type
- Calculate the checksum and place it at the end of the frame
- Escape any reserved characters (including MSB, LSB, and checksum)
That covers the basics of API frames / the boring part. Now let’s actually have some fun.
Part One: Initial Setup and communication in Transparent Mode
For all parts of this tutorial we’ll have two XBee radios with different settings. To make things easier we’ll give them names. For the rest of this tutorial “Atreyu” will refer to the XBee we’re connecting to our computer and “Falcor” will refer to the XBee we’re connecting to our Arduino.
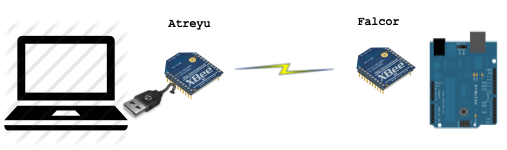
We will start with both XBee’s in transparent mode. Atreyu will connect to the X-CTU console on our computer, and Falcor will be wired in passthrough mode so that it will reflect any messages sent to it directly back to Atreyu.
First we need to configure the proper parameters on the radios so they will talk to each other. For both radios, use X-CTU to load the default parameters, and then configure/write the following settings:
|                   Settings for Atreyu                |
| Name                            | Value              |
|:-----------------------------   | -----------------: |
| `MY` (16-bit source address)    | `0`                |
| `DH` (Destination Address High) | `0`                |
| `DL` (Destination Address Low)  | `1`                |
| `AP` (API Enable)               | `API Disabled [0]` |
|                   Settings for Falcor                  |
| Name                            | Value                |
|:-----------------------------   | -------------------: |
| `MY`                            | `1`                  |
| `DH`                            | `0`                  |
| `DL`                            | `0`                  |
| `AP`                            | `API Disabled [0]`   |
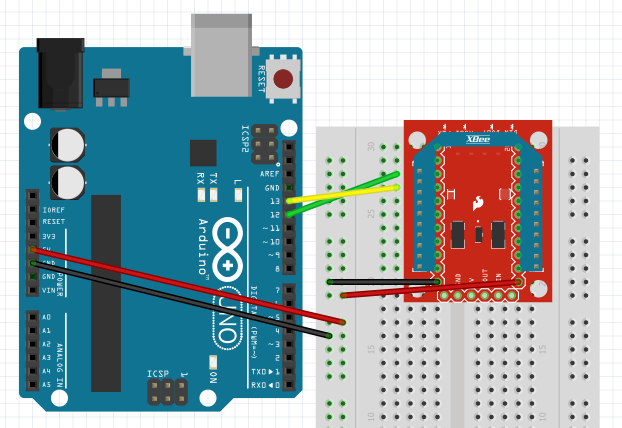
Leave Atreyu connected to the computer with the X-CTU software. Insert Falcor into your 3.3v-5v adapter/break-out board and connect the following pins from the break-out board:
- Connect the DIN pin to DOUT (passthrough)
- Connect 5v and GND to a 5v power source
- That’s it!
If you like, you can use the Arduino as an overly fanciful power supply. We will be using it in Part Three, so this way we’ll only need to modify one wire when we start communicating with the Arduino. Connect the Arduino to power (computer USB, or DC-in from wall or a battery) and it will provide enough current through the 5v pin to power the XBee.
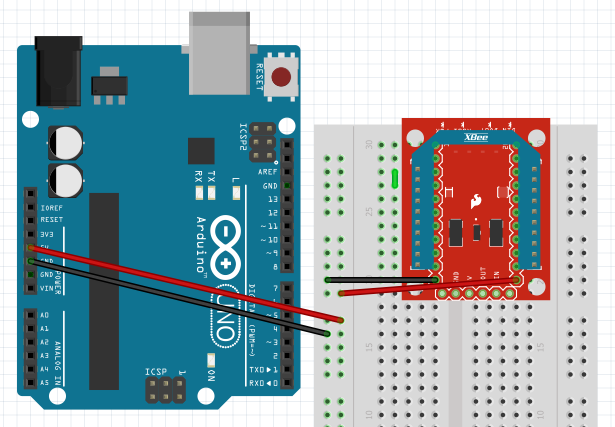
The illustration shows a SparkFun XBee explorer module because it is what is available in fritzing. The pin layout is identical to the module in the Parallax kit. {: .notice}
If you’ve set this up correctly, you should now be able to connect to Atreyu with the X-CTU console and start typing text and see it returned like below (Blue text is sent, Red is received).
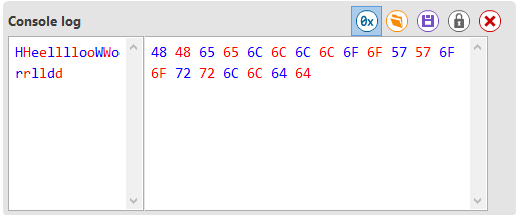
Congratulations! You’ve successfully setup and communicated with the XBee’s in transparent mode. Now we’re ready to switch Atreyu into API mode and start communicating using Python in part two.
Part Two: Communicating from a PC w/API mode using Python
Now that we have things setup and we’ve verified they can communicate, we can switch our first XBee into API mode and begin sending messages with it via Python. Re-configure the following parameter on Atreyu to enable API mode.
|        Settings for Atreyu        |
| Name    | Value                   |
| :-----  | -------------------:    |
| `AP`    | `API enabled w/PPP [2]` |
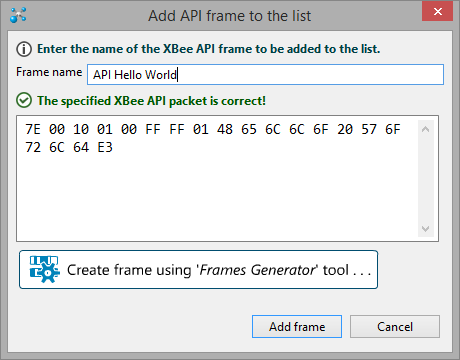
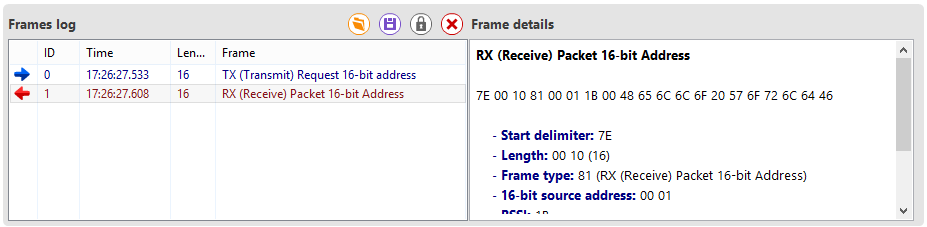
To test in X-CTU, you can create a packet with following Hex contents: 7E 00 10 01 00 FF FF 01 48 65 6C 6C 6F 20 57 6F 72 6C 64 E3 (You can copy and paste). You should be able to send the example packet in the X-CTU console and get a response (still being reflected from Falcor) identical to the second image.
Congratulations! You’ve sent your first message with XBee API mode. Now let’s send a package using Python.
Go ahead and clone the GitHub repository for this tutorial if you haven’t already. Also, make sure you have installed PySerial as well. Now navigate to the Python folder. You will need to modify line 5 in main.py to match the port your XBee resides on. Now if you navigate with a command prompt to this folder and run main.py your command prompt output should look like:
$ C:/.../main.py
Tx: 7e 00 10 01 00 ff ff 01 48 65 6c 6c 6f 20 57 6f 72 6c 64 e3
Rx: 7e 00 10 81 00 01 24 00 48 65 6c 6c 6f 20 57 6f 72 6c 64 3d
Msg: Hello World
Tx: 7e 00 7d 31 01 00 ff ff 01 7d 5e 7d 5d 7d 31 7d 33 5b 01 01 01 01 01 01 01 7d 5e
Rx: 7e 00 7d 31 81 00 01 24 00 7d 5e 7d 5d 7d 31 7d 33 5b 01 01 01 01 01 01 01 d8
Msg: 7e 7d 11 13 5b 01 01 01 01 01 01 01
You did it! What exactly did we do? Let’s start examining the code by looking at the body of main.py.
    xbee = XBee.XBee("COM3")  # Your serial port name here

    # A simple string message
    sent = xbee.SendStr("Hello World")
    sleep(0.25)
    Msg = xbee.Receive()
    if Msg:
        content = Msg[7:-1].decode('ascii')
        print("Msg: " + content)

    # A message that requires escaping
    xbee.Send(bytearray.fromhex("7e 7d 11 13 5b 01 01 01 01 01 01 01"))
    sleep(0.25)
    Msg = xbee.Receive()
    if Msg:
        content = Msg[7:-1]
        print("Msg: " + xbee.format(content))
As can be seen, we sent and received two messages. The first messages contents were simply “Hello World” in ascii encoding. The second message is a bit more obscure, it is formatted to demonstrate API mode character escaping which we’ll get more into soon. Now, let’s get into the pieces that are the heart of this tutorial. Lets start with the XBee __init__() method.
class XBee():
    ...
    def __init__(self, serialport, baudrate=9600):
        self.serial = serial.Serial(port=serialport, baudrate=baudrate)
All the class constructor does is initialize the serial port. You can read more on PySerial options in the PySerial API documentation.
Now lets look at the interesting stuff, starting with the SendStr() method.
    def SendStr(self, msg, addr=0xFFFF, options=0x01, frameid=0x00):
        return self.Send(msg.encode('utf-8'), addr, options, frameid)
The SendStr() simply decodes the message into a bytes object using UTF-8 encoding and passes it to the Send() method. If you’re only using characters from the ascii set they will only require one byte per character.
What is a bytes object? A bytes object is basically an array of integers with values between 0-255, so literally: bytes. You can read up more on bytes and bytearrays in the Python documentation and this helpful blog post. Bytes and bytearray objects are the required inputs for the PySerial library. A bytearray is basically the same as a bytes object, except mutable. Now lets look at the Send() method.
    def Send(self, msg, addr=0xFFFF, options=0x01, frameid=0x00):
        if not msg:
            return 0

        hexs = '7E 00 {:02X} 01 {:02X} {:02X} {:02X} {:02X}'.format(
            len(msg) + 5,           # LSB (length)
            frameid,
            (addr & 0xFF00) >> 8,   # Destination address high byte
            addr & 0xFF,            # Destination address low byte
            options
        )

        frame = bytearray.fromhex(hexs)
        #  Append message content
        frame.extend(msg)

        # Calculate checksum byte
        frame.append(0xFF - (sum(frame[3:]) & 0xFF))

        # Escape any bytes containing reserved characters
        frame = self.Escape(frame)

        print("Tx: " + self.format(frame))
        return self.serial.write(frame)
Send() accepts ‘msg’ as its first parameter, which is expected to be a bytes or bytearray object. Optionally you can specify an address, options, or a frameid but the defaults are to broadcast, disable acknowledgments, and have no frameid.
The first thing the Send() method does is initialize a transmit request frame in a bytearray object. It first formats a string that contains the desired hex characters using string formatting operations. This isn’t the most efficient way, but it makes things more readable. Then the bytearray fromhex() method will decode the string into a bytearray object e.g. bytearray.fromhex() with the strings "7E 00", "7E00", " 7e00", and "7e00 " will all create a bytearray object with bytes [0x7E, 0x00]. We use this method to input our LSB, frameid, address, and options bytes (MSB is always zero). Our LSB is equivelant to the length of our frame between the LSB and checksum or rather the length of the message contents plus 5 bytes: the API type, frameid, address, and options bytes required for a transmission request frame.
Next the function extends the frame to contain our message. Then the checksum is calculate and appended to the end. Now that our frame is formatted, we escape any reserved characters after the start delimiter using the Escape() method.
    def Escape(self, msg):
        escaped = bytearray()
        reserved = bytearray(b"\x7E\x7D\x11\x13")

        escaped.append(msg[0])
        for m in msg[1:]:
            if m in reserved:
                escaped.append(0x7D)
                escaped.append(m ^ 0x20)
            else:
                escaped.append(m)

        return escaped
After escaping, the message is ready to send! The Send() function prints the formatted frame for debug using the format() function, and then passes it to the serial port with the PySerial write() method. The format() function is just a simple function to convert a byte object into a more readable string for debug output.
    def format(self, msg):
        return " ".join("{:02x}".format(b) for b in msg)
Here’s a breakdown of the contents of the formatted frames for the two messages in main.py:
Msg: Hello World ------------------------------------------------------------------------------
                                                                Checksum |
                                        -  "hello world" in Ascii -      |
                             Options |                                   |
                      Address LSB |  |                                   |
                   Address MSB |  |  |                                   |
                   Frame ID |  |  |  |                                   |
              Tx Request |  |  |  |  |                                   |
                  LSB |  |  |  |  |  |                                   |
               MSB |  |  |  |  |  |  |                                   |
start delimiter |  |  |  |  |  |  |  |                                   |
                |  |  |  |  |  |  |  |                                   |
                7e 00 10 01 00 ff ff 01 48 65 6c 6c 6f 20 57 6f 72 6c 64 e3


Msg: 7e 7d 11 13 5b 01 01 01 01 01 01 01 ------------------------------------------------------
                                                                           Escaped Checksum |
                                Options |                                                   |
                         Address LSB |  |                                                   |
                      Address MSB |  |  |                                                   |
                      Frame ID |  |  |  |                                                   |
                 Tx Request |  |  |  |  |                                                   |
          LSB Escaped |     |  |  |  |  |                                                   |
               MSB |  |     |  |  |  |  |                                                   |
start delimiter |  |  |     |  |  |  |  |                                                   |
                7e 00 7d 31 01 00 ff ff 01 7d 5e 7d 5d 7d 31 7d 33 5b 01 01 01 01 01 01 01 7d 5e
So you can see, the second message is specially designed so the LSB and checksum bytes in the formatted frame require escaping, just to demonstrate that necessity (and that it works).
That’s it for sending a message. The next step is to receive the message. This gets a bit more complicated. When you receive through serial, it’s not guaranteed that the entire message will come through at once. You also may get the beginning of another message. It’s important to receive as much as possible in a call, parse out any messages, and hold onto any remaining bytes until the next time your program attempts to receive. This is done in the example code Receive() method:
    def Receive(self):
        remaining = self.serial.inWaiting()
        while remaining:
            chunk = self.serial.read(remaining)
            remaining -= len(chunk)
            self.RxBuff.extend(chunk)

        msgs = self.RxBuff.split(bytes(b'\x7E'))
        for msg in msgs[:-1]:
            self.Validate(msg)

        self.RxBuff = (bytearray() if self.Validate(msgs[-1]) else msgs[-1])

        if self.RxMessages:
            return self.RxMessages.popleft()
        else:
            return None
The code first receives any data available on the serial port. Thanks to python, we can easily ‘split’ the buffer around the 0x7E start delimiter into a list of bytearrays then iterate through them. Each call to Validate() will append the message to the RxMessages if the message validates. If the last message doesn’t validate, it may be the beginning of a new message, so the method holds onto it until the next call.
With this code, if you send data and call Receive() immediately, the response message will not be ready in the serial buffer yet. Python code runs much faster than the 9600 baud rate at which the serial port is operating. Because of this it’s necessary to pause at least the minimum amount of time it takes the message to transmit, the source to process/respond, and the radio to receive/send the message back to our program. This is why main.py sleeps for 1⁄4 second after sending. In production code it may be more reasonable to use callbacks or threading, but that’s beyond the scope of this tutorial; we’ll keeping it simple. Still, there is an alternate version of XBee.py with threads and thread-safe Queues for message reception in the repository if you’re interested.
{: .notice}
For each start delimiter found in the receive buffer, the validate() method is called.
    def Validate(self, msg):
        # 9 bytes is Minimum length to be a valid Rx frame
        #  LSB, MSB, Type, Source Address(2), RSSI,
        #  Options, 1 byte data, checksum
        if (len(msg) - msg.count(bytes(b'0x7D'))) < 9:
            return False

        # All bytes in message must be unescaped before validating content
        frame = self.Unescape(msg)

        LSB = frame[1]
        # Frame (minus checksum) must contain at least length equal to LSB
        if LSB > (len(frame[2:]) - 1):
            return False

        # Validate checksum
        if (sum(frame[2:3+LSB]) & 0xFF) != 0xFF:
            return False

        print("Rx: " + self.format(bytearray(b'\x7E') + msg))
        self.RxMessages.append(frame)
        return True
The first thing the Validate() method does is double check the message array (minus any escapes) is at least the size required for a message. The next thing it does is undo any escape characters with the Unescape() method.
    def Unescape(self, msg):
        if msg[-1] == 0x7D:
            # Last byte indicates an escape, can't unescape that
            return None

        out = bytearray()
        skip = False
        for i in range(len(msg)):
            if skip:
                skip = False
                continue

            if msg[i] == 0x7D:
                out.append(msg[i+1] ^ 0x20)
                skip = True
            else:
                out.append(msg[i])

        return out
We need to do this before the next steps to read the LSB and checksum bytes. Then the Validate() method double checks the current frame length is at least the size indicated by the LSB. If it is, the last step in validation is to verify the checksum by summing all characters from the LSB up to the checksum and making sure the lower byte is equal to 0xFF. If all this checks out, we have a valid message! The message is now printed for debug output and placed in the RxMessages list member variable.
That concludes all the example pieces to do basic message sending and receiving in API mode using Python. Next, we’ll switch worlds into C++ code to handle message reception on an Arduino.
Part Three: Communicating from an Arduino w/API mode
Now we’ll need to re-connect Falcor to our computer briefly to reset the following parameters in X-CTU:
|        Settings for Falcor        |
| Name    | Value                   |
| :-----  | -------------------:    |
| `AP`    | `API enabled w/PPP [2]` |
Now return Falcor to the 3.3v-5v breakout board but don’t wire it yet.
Before wiring the Arduino to the XBee, we’ll need to load our software onto the board. The Arduino software should recognize the Arduino.ini file, once loaded simply compile and load the program onto your board. Once it’s programmed, disconnect the Arduino and wire the XBee to it like so:
- Connect DOUT (3 from top left) to port 12 on Arduino
- Connect DIN (4 from top left) to port 13 on Arduino
- Leave 5v and GND connect as before (if you used Arudino as power source, otherwise, connect them to Arduino 5v,GND)
We’re using pins 12, 13 as our Rx, Tx pins respectively using the SoftwareSerial library. This frees up the default Tx,Rx pins to send debug data to our computer if you like. This also allows you to communicate while plugged into your computer port, otherwise the Arduino serial would be occupied by the connection to your computer. In realistic applications you would want to use a hardware serial port with its own UART.
Assuming everything is plugged in, you can go back to your console from Part Two and run main.py again. You should get an output that looks like this:
$ C:/.../main.py
Tx: 7e 00 10 01 00 ff ff 01 48 65 6c 6c 6f 20 57 6f 72 6c 64 e3
Rx: 7e 00 1a 81 00 01 18 00 79 6f 75 20 73 65 6e 74 3a 20 48 65 6c 6c 6f 20 57 6f 72 6c 64 b8
Msg: you sent: Hello World
Tx: 7e 00 7d 31 01 00 ff ff 01 7d 5e 7d 5d 7d 31 7d 33 5b 01 01 01 01 01 01 FIFO 01 7d 5e
Rx: 7e 00 1b 81 00 01 1a 00 79 6f 75 20 73 65 6e 74 3a 20 7d 5e 7d 5d 7d 31 7d 33 5b 01 01 01 01 01 01 01 51
Msg: 79 6f 75 20 73 65 6e 74 3a 20 7e 7d 11 13 5b 01 01 01 01 01 01 01
You’ll notice it’s the same content as earlier, except now our returned messages have “you sent: “ appended to the front. The Arduino is now receiving, editing, and then returning our messages.
So there it is, you’ve now sent and received data in API mode with Python and Arduino. New doors will open and bells will ring as you celebrate this wondrous day. I’ll let you call your parents and tell them, but when you’re done let’s review the code.
As before, we’ll begin with our main code in Arduino.ino. First the setup:
XBee xbee;
Queue RxQ;
SoftwareSerial sserial(12,13);

void setup(void)
{
    sserial.begin(9600);
}
We instantiate an instance of the XBee, Queue, and SoftwareSerial classes. We’ll go more into detail on the XBee class soon. The Queue is a C++ implementation of a standard FIFO queue for the unsigned char data type, with a couple home-brewed helper methods to aid in this application. If that sounds unfamiliar, google “FIFO queue” and read up on them, it’s a handy data structure. One of the most basic. We’ll use the queue as our receive buffer. The only code in our setup() method is to start off our serial connection at 9600 baud.
void loop(void)
{
    delay(5);
    int queueLen = 0;
    int delPos = 0;

    while (sserial.available() > 0){
        unsigned char in = (unsigned char)sserial.read();
        if (!RxQ.Enqueue(in)){
            break;
        }
    }

    queueLen = RxQ.Size();
    for (int i=0;i<queueLen;i++){
        if (RxQ.Peek(i) == 0x7E){
            unsigned char checkBuff[Q_SIZE];
            unsigned char msgBuff[Q_SIZE];
            int checkLen = 0;
            int msgLen = 0;

            checkLen = RxQ.Copy(checkBuff, i);
            msgLen = xbee.Receive(checkBuff, checkLen, msgBuff);
            if (msgLen > 0){
                unsigned char outMsg[Q_SIZE];
                unsigned char outFrame[Q_SIZE];
                int frameLen = 0;
                int addr = ((int)msgBuff[4] << 8) + (int)msgBuff[5];

                // 10 is length of "you sent: "
                memcpy(outMsg, "you sent: ", 10);
                // len - (9 bytes of frame not in message content)
                memcpy(&outMsg[10], &msgBuff[8], msgLen-9);

                // 10 + (-9) = 1 more byte in new content than in previous message
                frameLen = xbee.Send(outMsg, msgLen+1, outFrame, addr);
                sserial.write(outFrame, frameLen);
                i += msgLen;
                delPos = i;
            }else{
                if (i>0){
                    delPos = i-1;
                }
            }
        }
    }

    RxQ.Clear(delPos);
}
That’s a lot to take in real quick, but don’t be too intimidated. This is what is going on in the loop() method:
- A small 5ms delay, to give the serial time to do work.
- Check the serial buffer for content. If any is available, read it into the queue.
- Parse through the queue for a start delimiter.
- If a delimiter is found, check if the content after the delimiter is a proper message using
XBee.Receive(). - If the content is valid, create a new message to send.
- New message is “you sent: “ + content of received message. Message is created using
XBee.Send()using address parsed from incoming frame, then sent using thewrite()call to SoftwareSerial. - After parsing is done the delPos variable stores off the last location of possible good/unused data in the queue, it is used to clear any unneeded contents. We may not have received the full portion of a message yet, so we’ll hold on to any we may still want.
The code makes liberal use of buffers to keep code ‘simpler’ as lengths vary between the data in the queue, the read message and output messages. Algorithmically there’s definitely more efficient ways to do this, but that would be hell to read for a tutorial. Something more eye friendly could possibly be written with other Arduino libraries such as String, but as a guy used to using C in embedded applications I stuck to what I know. Maybe an optimization for a future version :).
Now, let’s once again get to the guts of our code. All of the main parts should look very familiar. It’s basically carbon copies of the Python methods, except with C-friendly data structures. I won’t add too much wordiness to the tutorial by re-explaining how things work, so I’ll just put the code here to peruse. But just for a quick re-hash:
Receive()validates content to ensure it is a proper messageunescape()parses out escaped characters to their original contentSend()Takes input content and places it into a Tx request frame (the calling method is expected to send it)escape()takes an input buffer and escapes any reserved characters.
All XBee methods count on the calling class to provide the input and output buffers. For all buffer sizes we’re using the Q_SIZE defined in our Queue class, since that’s the max data we’ll encounter. The size is set to 220, a comfortable size larger than the max XBee message size of 100. This, of course, assumes you may only receive max one 100 byte frame at a time. This size is safe for simple applications such as this.
int XBee::Receive(unsigned char *inBuff, int len, unsigned char *outBuff){
    int unescapeLen = 0;
    unsigned char checksum = 0;
    unsigned char LSB = 0;

    if (inBuff[0] != 0x7E)
        return 0;

    if (len < 10)
        return 0;

    unescapeLen = unescape(inBuff, len, outBuff);

    // Check we have at least the amount of bytes indicated by LSB
    LSB = outBuff[2];
    if (LSB > (unescapeLen - 4))
        return 0;

    // Calculate our checksum
    // (char will overflow, no need to AND for lower bytes)
    for (int i=3; i<LSB+4; i++){
        checksum += outBuff[i];
    }

    if (checksum != 0xFF)
        return 0;

    return LSB+4;
}
int XBee::unescape(unsigned char *input, int inLen, unsigned char *output){
    int pos = 1;
    bool skip = false;
    unsigned char curr = 0;

    output[0] = input[0];
    for (int i=1; i<inLen; i++) {
        if (skip){
            skip = false;
            continue;
        }

        if (input[i] == 0x7D){
            curr = input[i+1] ^ 0x20;
            skip = true;
        }else{
            curr = input[i];
        }

        output[pos] = curr;
        pos++;
    }

    return pos;
}
int XBee::Send(unsigned char *msg, int len, unsigned char *outBuff, int addr){
    unsigned char buf[100];
    int escapedLen = 0;
    unsigned char checksum = 0;

    buf[0] = 0x7E;
    buf[1] = 0x00;
    // LSB = content + 5 (content length + API type + frameid + addr(2) + options)
    buf[2] = (unsigned char)(len + 5);
    buf[3] = 0x01;  // transmit request
    buf[4] = 0x00;  // Frame ID
    buf[5] = (unsigned char)((addr & 0xFF00) >> 8);
    buf[6] = (unsigned char)(addr & 0xFF);
    buf[7] = 0x01;  // Disable acknowledge
    memcpy(&buf[8], msg, len);

    for (int i=3;i<len+8;i++){
        checksum += buf[i];
    }

    // Total length = LSB + 9 (LSB value + MSB + LSB + start delimiter + checksum)
    buf[len+8] = 0xFF - checksum;
    escapedLen = escape(buf, len+9, outBuff);

    return escapedLen;
}
int XBee::escape(unsigned char *input, int inLen, unsigned char *output){
    int pos = 1;

    output[0] = input[0];
    for (int i=1; i<inLen; i++){
        switch(input[i]){
            case 0x7D:
            case 0x7E:
            case 0x11:
            case 0x13:
                output[pos++] = 0x7D;
                output[pos++] = input[i] ^ 0x20;
                break;
            default:
                output[pos++] = input[i];
                break;
      }
   }

   return pos;
}
That sums up all the main parts of the XBee example code.
Review
That covers a basic example of programming for XBee 802.15.4 radios configured in API mode. I found API mode very helpful when programming for my Masters thesis, which you should check out the source code for if you would like to see an example of receiving, parsing, and sending many different API frame types in an actual application. Hopefully this tutorial and example code enable you to get off the ground running with your application, or better understand some feature of Python, Arduino, XBee, serial communications, etc. If you’ve encounter any trouble running the examples, or have any questions / comments / concerns please post them in the comments so others with similar problems can see too :).